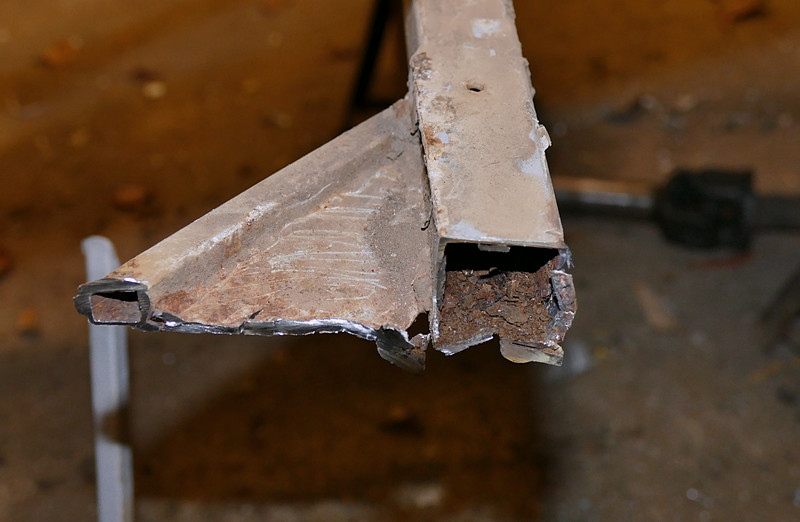
Yes, the worm has got a hold.
I took off the side panels and discovered the main 1" square steel tube chassis rail on the driver's side was not as solid as I would have preferred. In fact it was a bit wooly around the front suspension mounting points as well.
This needed some deep thought.....
I had already removed the back axle and done some work on that (more of that in another post) so I was well on the way to being past the point of no-return anyway.
When I say point-of-no-return I don't mean giving up, I mean either just fettling the odd bit enough to run the car, or fixing everything that I see wrong.
This was the car with the rear side panel removed
Closer examination proved a little worrying
Being very brave, and not crying, I chopped the chassis rail out (after chocking up the chassis and taking a few measurements).
You can see some 1" square steel tube (16 gauge) on top of the car. I needed about 6 ft, but had to buy 20ft.
Boo.
The rail turned in two directions which I had to cut and weld up before fitting.
I dealt with the front suspension mounts by plating the existing points rather than start from scratch
Then I cleaned up the tree slider and welded that back on. The front end of it had been made from square steel tube, (this is the passenger side as it happens but both sides are getting the treatment)
I replaced that with round tube, to look better.
If you are sharp-eyed you'll see that I also lowered the top rail by 2.5" This is purely to make it easier to get in and out of the car.
Then I re-attached the mounting plate for the fiddle brakes, but reduced in size so that it just supports the lever assembly.
Next.
I got around to taking of the tree slider bar on the passenger side to alter the front end as on the driver's side.
"Ah!"
The bottom chassis rail on that side wasn't too clever either. Not as feathery but certainly with some rusty bits. I should have guessed that someone wouldn't have bothered tacking dirty great angle-iron pieces on each side just for fun..... There was also a big crack through the chassis tube at the bottom of the upright that the shocker is mounted on.
So out with the cutting disc again and a repeat of the driver's side replacement.
I also lowered the top rail for the sake of symmetry and because some of my shorter-arsed passengers seem to have trouble getting their leg over.
Now in the chop-and-replace frame of mind I took against the crossmember in the "boot" area. It helps support two batteries and locates the panhard rod. Again someone had made merry with the welding stick and stuck on a bit of angle-iron on. So it had to go.
What a good job I had to buy all that steel tube!
This was underneath looking at the crossmember, just above the panhrad rod.
Whilst I was at it I replaced a bit of the rear crossmember (rust) and the top rail of the "boot" area with it's strut. Someone had made a triangulated plate to stop it twisting, as the spare wheel was mounted on it. This would make the new alloy rear panel an awkward fit and, as I was going to mount the spare on the roll over bar, it didn't matter.
I also put some new diagonals from the rear up to the top rail as I wondered if the spare wheel and batteries had had a hand in creating the cracks in the chassis. Lots of weight bashing down when the suspension bottoms etc.
This was the scene of the crime.
... and this was the rear compartment without, and then with, the diagonal.
I'm not sure it will make any difference, but it cost nothing, weighs nearly nothing, so it doesn't do any harm, and may help.
I have to keep reminding myself that any faults I find have taken up to 40 years to appear, so this is more a question of doing a thorough job than expecting anything to go wrong anytime soon.
That's enough for now.
I'll detail the work on the rear axle and the steering wheel hub next time


No comments:
Post a Comment